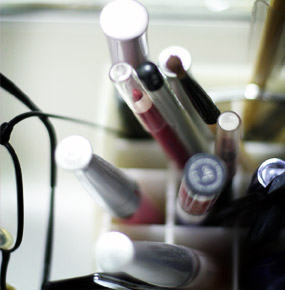
 I use eye pencils as eyeliner for years, and it never occurred to me that sharpeners made a difference because aren’t eye pencils are just pencils with softer tips? With this mentality, I’ve been using a cheap Wet ‘n’ Wild sharpener I got for $0.99. Generally, the sharpener worked… to an extent. But at the time, I was using cheap eyeliner pencils that cost no more than a dollar or two. So if the tips kept breaking and the sharpeners chewed the pencils like a wood chuck, I didn’t really care. But now that I am actually investing money and purchasing better eyeliners, such as, Urban Decay’s 24/7 Glide-on eye pencils, I did not want to have half of my eye pencil eaten up by a faulty sharpener, especially at $17 an eye pencil.
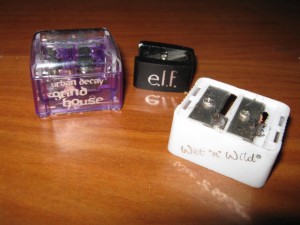
This review is for three sharpeners that I have in my makeup bag, and does price really make a difference in sharpeners?
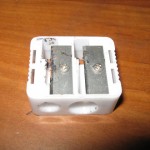 Wet ‘n’ Wild
I got this sharpener a long time ago. I think the sharpeners that Wet ‘n’ Wild puts out now are silver in color, and I don’t know if they have improved their product or not, but after using this one. I’m not tempted to try even if it is only a couple bucks. However, this is a dual sharpener and has a sharpener for the jumbo eye pencil as well.
This sharpener did its job. It sharpened my eye pencils, but it sharpened the pencils like a regular No. 2 pencil. We’ve all experience the sharpened pencil where one side is the lead and the other is side a wood point, and just when you thought you had about half a centimeter of lead left, you find that you can’t write normally anymore and you have to start writing at a ridiculously odd angle because the sharpener does not sharpen evenly around the pencil.
Now this is a problem for eye pencils because when you’re lining your eyes and reach near the end of the tip, the wood strip at the end can scratch your eyelids, and I’ve done this a bunch of times when I didn’t pay attention to the bluntness of my eye pencils. Believe me, it hurts!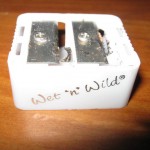
In addition to getting scratched eyelids, this sharpener has a tendency to break the tips while sharpening, and this happened quite often. So often that I would give up and only half sharpen the pencil enough to give me enough of a point to line my eyes, but that problem still led to my eyelids getting scratched. I can’t win!
Maybe Wet ‘n’ Wild has changed the blade in their silver sharpeners, but I won’t be trying it anytime soon unless I get it for free, then maybe I’ll give it a go.
ELF Sharpene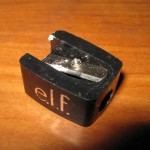 r
r
I actually forgot I had this sharpener. I received this sharpener through the ELF “Get the Look” set and just tossed it into my makeup bag and never looked back until now. In fact, I have three of these sharpeners.
Since ELF sells these sharpeners at about $1.00, I assumed they were as bad as the Wet ‘n’ Wild one I have, but since I had them, I thought I’d try them out. These ELF sharpeners are a hit or miss. The first sharpener I grabbed was bad. It did not sharpen at all. I stuck the pencil into the sharpener and twisted and twisted and nothing happened. I even tried pressing the pencil closer to the blade thinking if it “caught” it would start sharpening. No luck. Just as I was about to write off these sharpeners, I remembered I had another one in my bag and tried that one out.
This sharpener looked exactly like the one I just tried, but instead it sharpened my eye pencil like a breeze. It didn’t get stuck, didn’t break the tip, or make a big mess. In fact, I was able to sharpen my eye pencil to a pretty sharp point without any breakage. Also it didn’t sharpen the pencil like a No. 2 pencil, so no scratchy eyelids.
I also tried the third sharpener I had, and that one worked fine as well. So if you want a cheap sharpener, the ELF sharpener is good… if you get one that works. 2 out of 3, I guess those odds are too bad. Another downside is that this sharpener only has one size, so if you have a jumbo eye pencil you’re going to need another sharpener. However, ELF does have a Dual pencil sharpener for sale that comes with two sharpeners for $1.00, which is a great deal. Apparently the ones I have were the “bonus” sharpeners.
 Urban Decay: Grind House
After a couple weeks of watching my Urban Decay eye pencils get mutilated, I bit the bullet and bought Grind House. I figured that Urban Decay must make a sharpener that is made for their eye pencils, and they did.
I have never been happier with a sharpener than with Grind House. With just a few twists, my blunt eye pencils were sharp again without any breakage or wooden points to scratch my eyelids. Grind House is basically a sharpener with a built in container to hold the pencil shavings so you don’t have to be standing over a trash can to sharpen your eye pencils. But be warned that the cap is not very tight and can come off if it is being tossed around in your makeup bag or purse, so I recommend emptying the container of shavings before putting it away to prevent shavings littering your bag.
I also like that Grind House comes with two sizes, so my regular eye pencils are covered and so are my jumbo pencils. But I have noticed that for the jumbo pencil side of the sharpener, the plastic point stopper prevents my jumbo pencil from getting too sharp. I would like my jumbo pencils a bit sharper, but this is not a huge problem for me.
At $9 a pop, Grind House is expensive, but it is worth it. Also it has a very interesting design on the cap that includes a butterfly, a heart, a flower, a worm or caterpillar, a skull, and a gun. A perfect design that goes with the Urban Decay brand.
So basically, there are cheap sharpeners that work as well as expensive sharpeners, but just beware “you get what you give”.