0

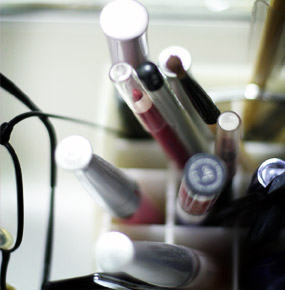
After I received my z-palettes, I started to research ways to depot my eyeshadows. But I was having trouble finding out how to depot bareMinerals READY Foundations.

So I decided to write up my own tutorial for it. Figuring it shouldn’t be too hard, right? Famous Last words.
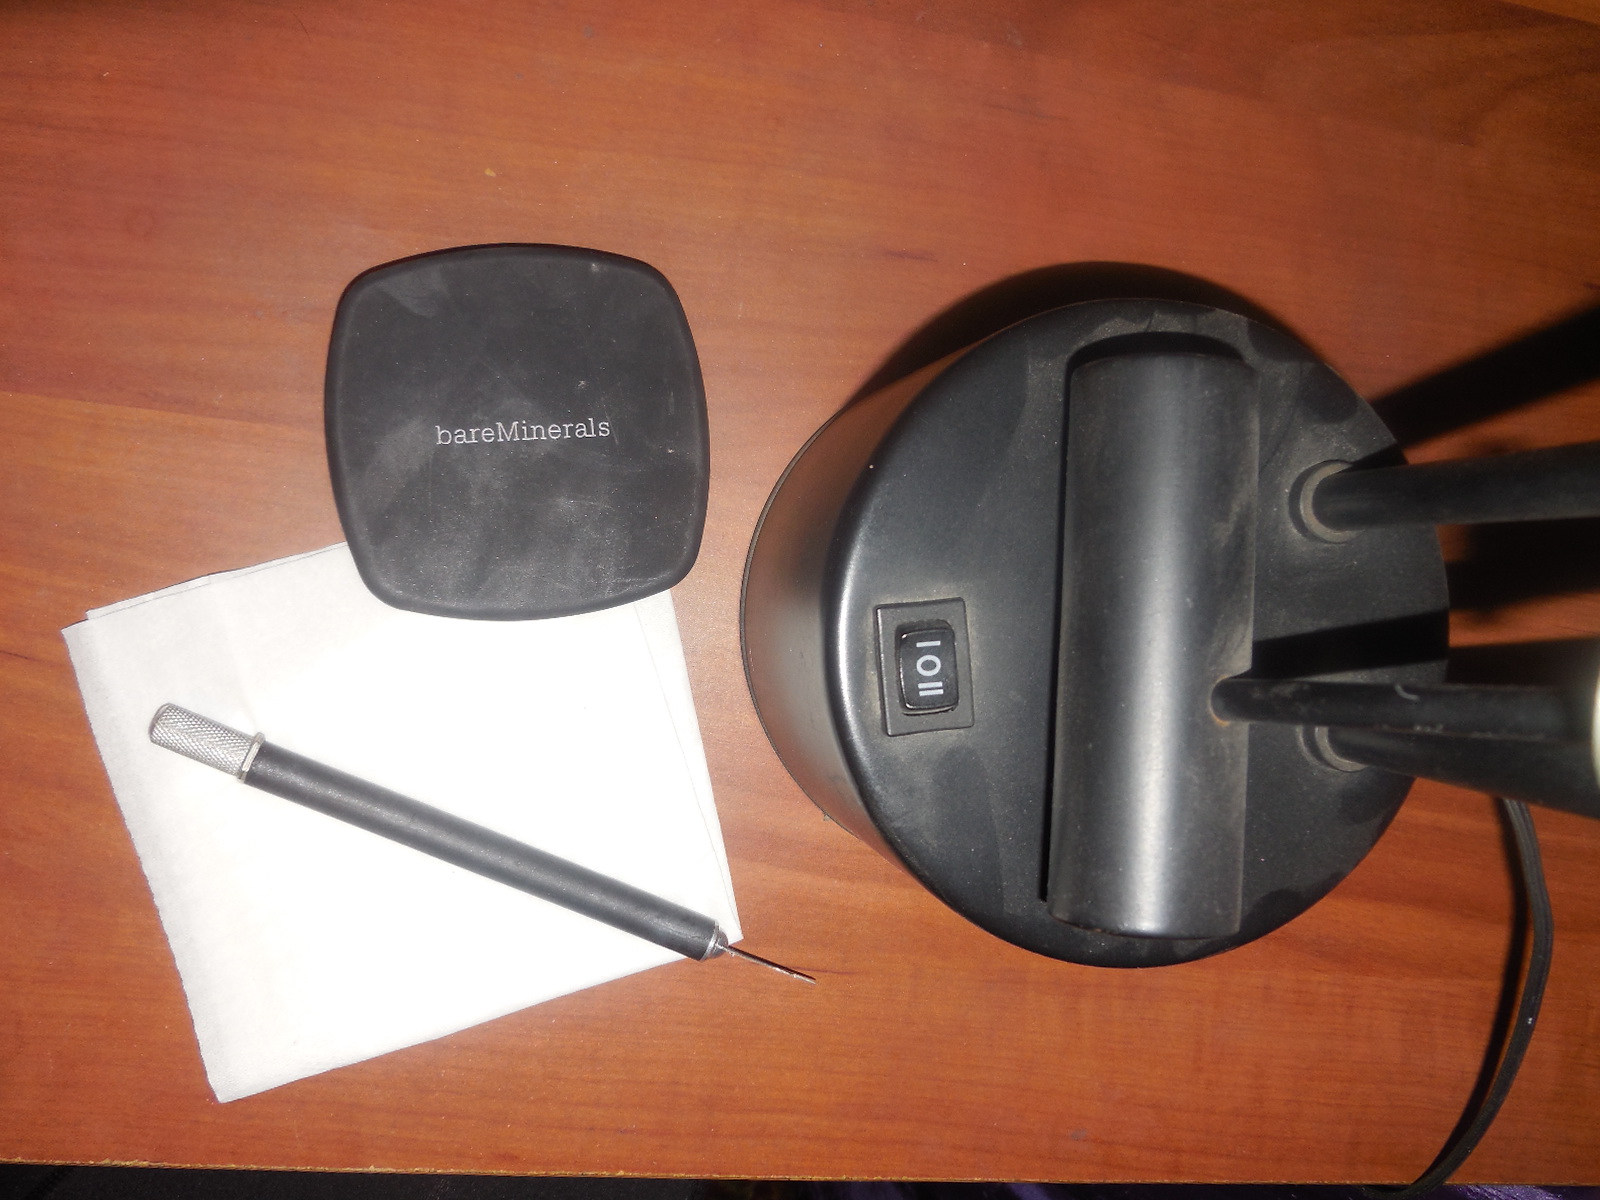
Depotting tools

Tools:

  • bareMinerals READY compact

  • X-acto Knife (or anything flat and sharp)

  • Halogen Lamp (I got the lamp idea from Beauty Vibes, like her, I don’t have a flat iron.)

  • Tissues and/or paper towels

  • Nail Polish Remover or Rubbing Alcohol

Basically all you need to do is place a tissue paper over the lamp face and place your compact on the lamp. Since my lamp doesn’t turn upside down easily. I had to lean it on its back, balance it between two boxes, and work very hard to not burn myself.

Compact on lamp

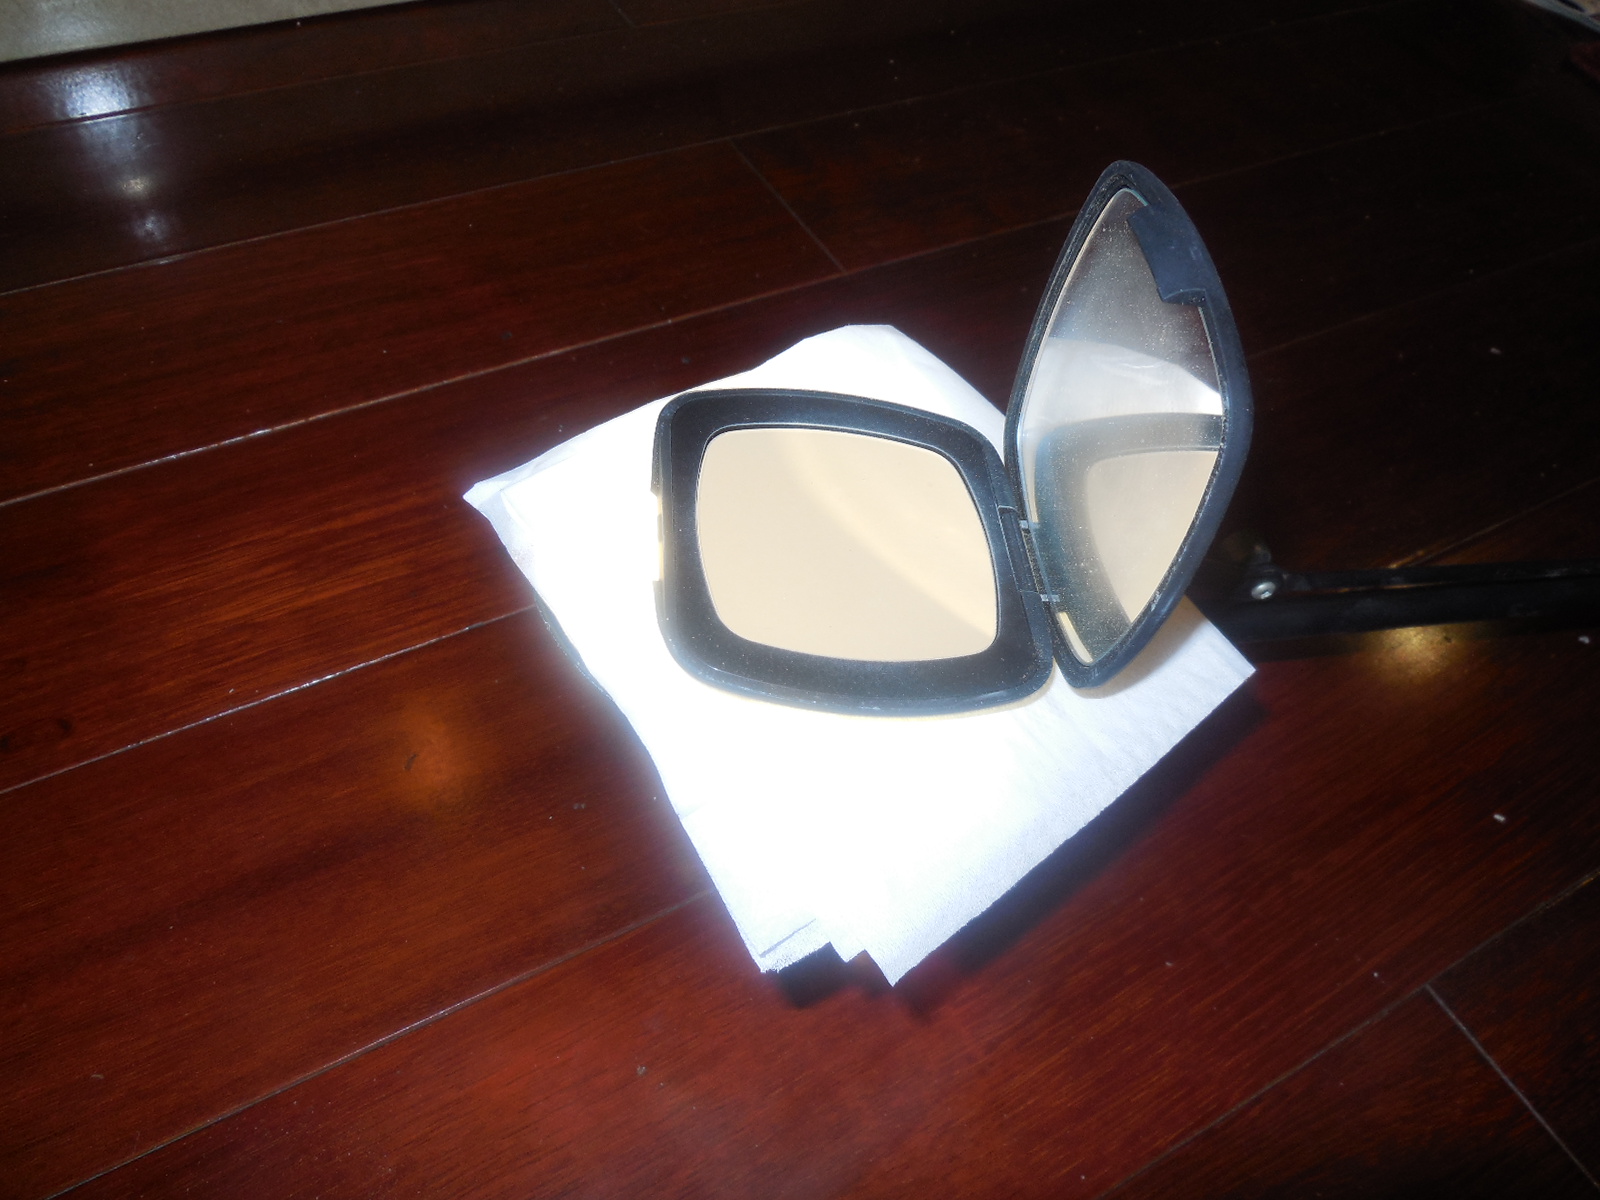
I let the compact sit for about 2 minutes since my lamp gets very hot very quickly. If after 2 minutes and the pot still won’t budge, I’d put it on for another 2 minutes. But usually after about 5 minutes the pot is already very hot, and you don’t want to melt the container.

Wedging x-acto   Pop out pan

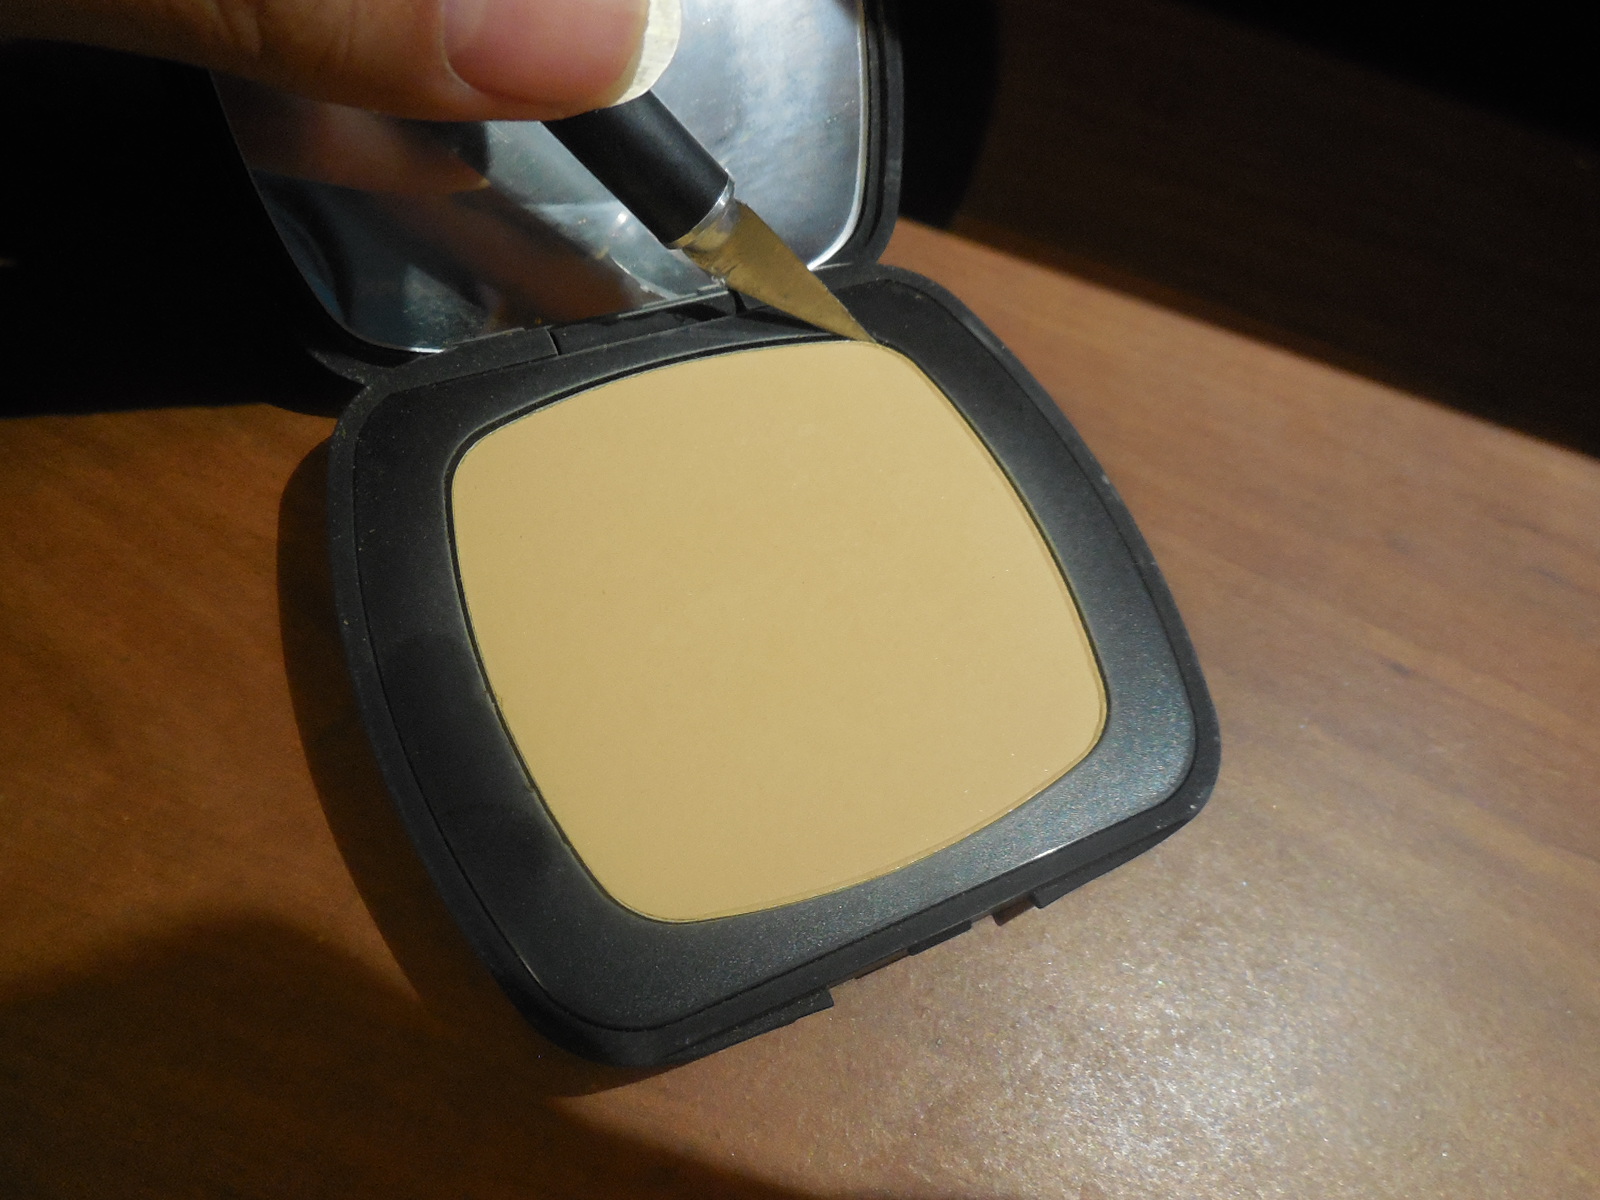
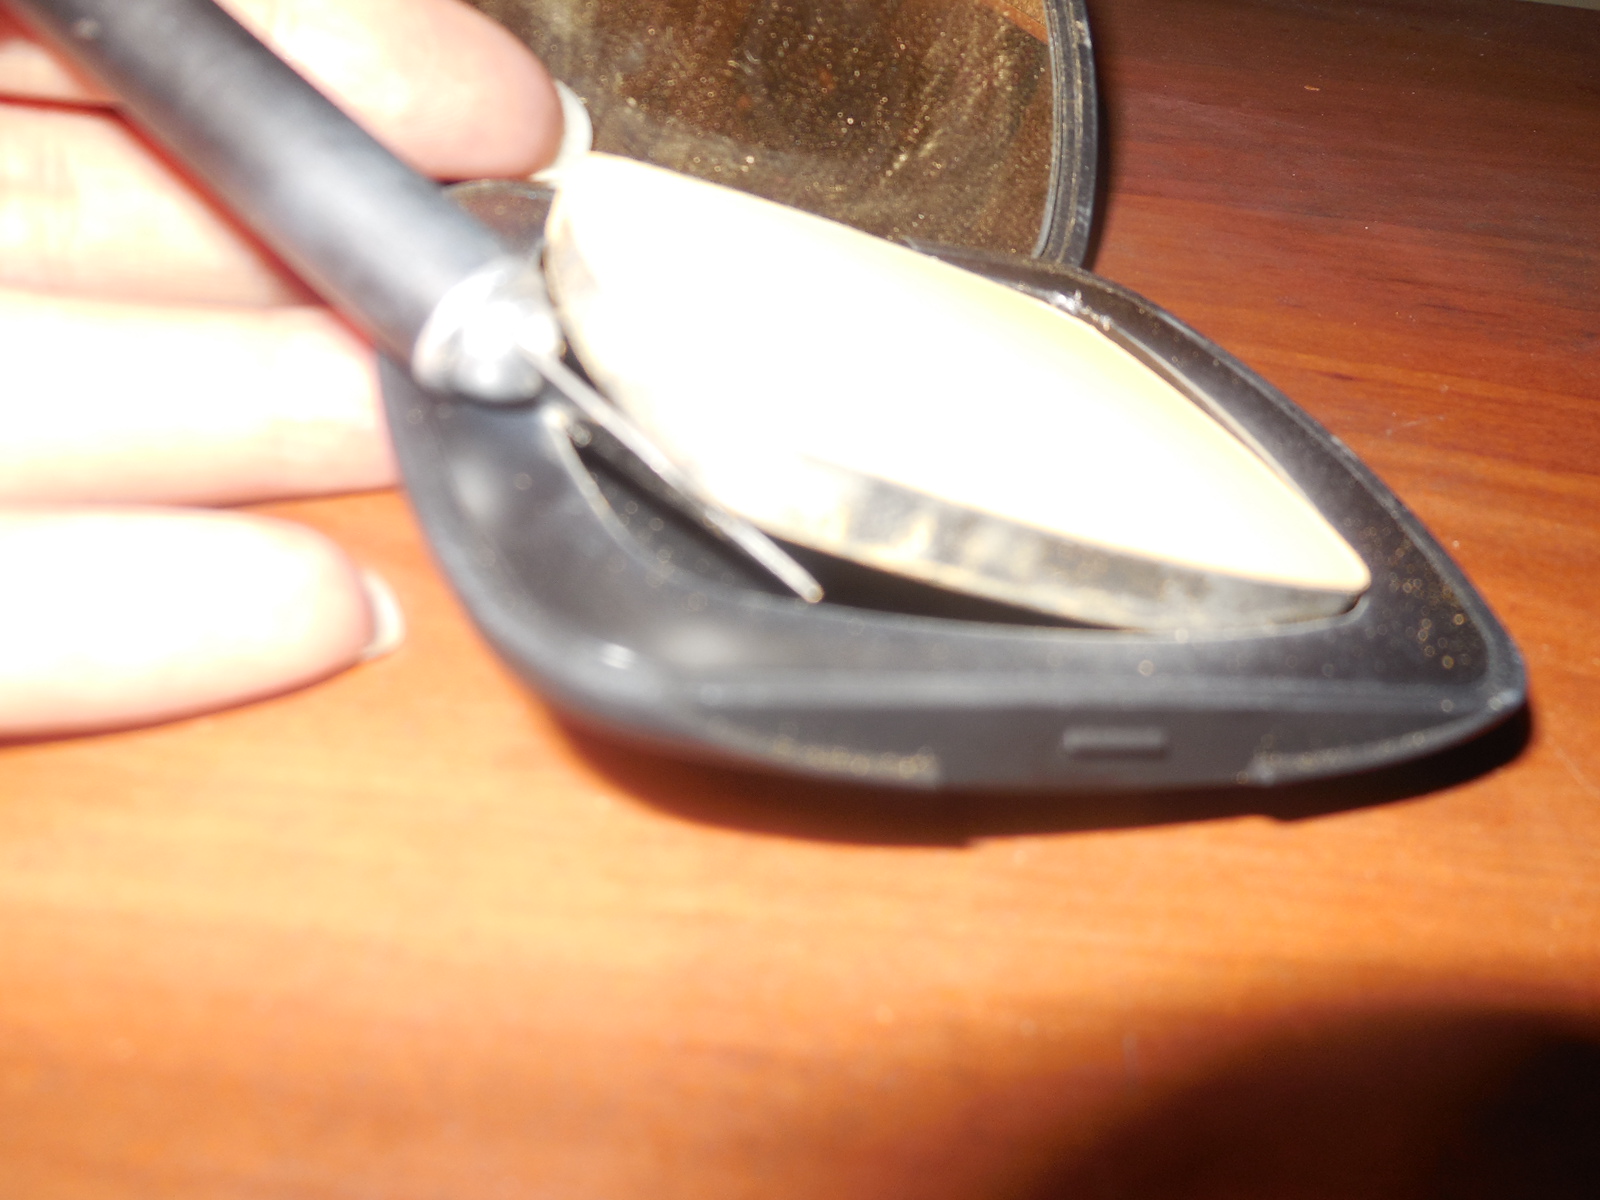
When the container is hot enough, take a X-acto knife and wedge it into the gap between the pot and container. Then carefully try to wedge the pot out. This takes some patience. If the pot is still being stubborn, let it heat on the lamp for another minute and try again. Eventually the pot will pop out. Depending on the contents, there is a possibility of it cracking a bit. For the READY foundation, bronzer, and blush, I didn’t have any cracking problems at all. However, for the the READY Touch-Up finishing Veil, I did have minor cracks along the side. But not enough to be considered damaged.

I used the same method to depot the bareMineral concealer as well. You don’t have to worry about that cracking since it’s a cream. Just be aware that it might melt a bit from the heat. Just let it sit for a bit to “harden” before you start working on wedging the pot of the container.

glue back   cleaning

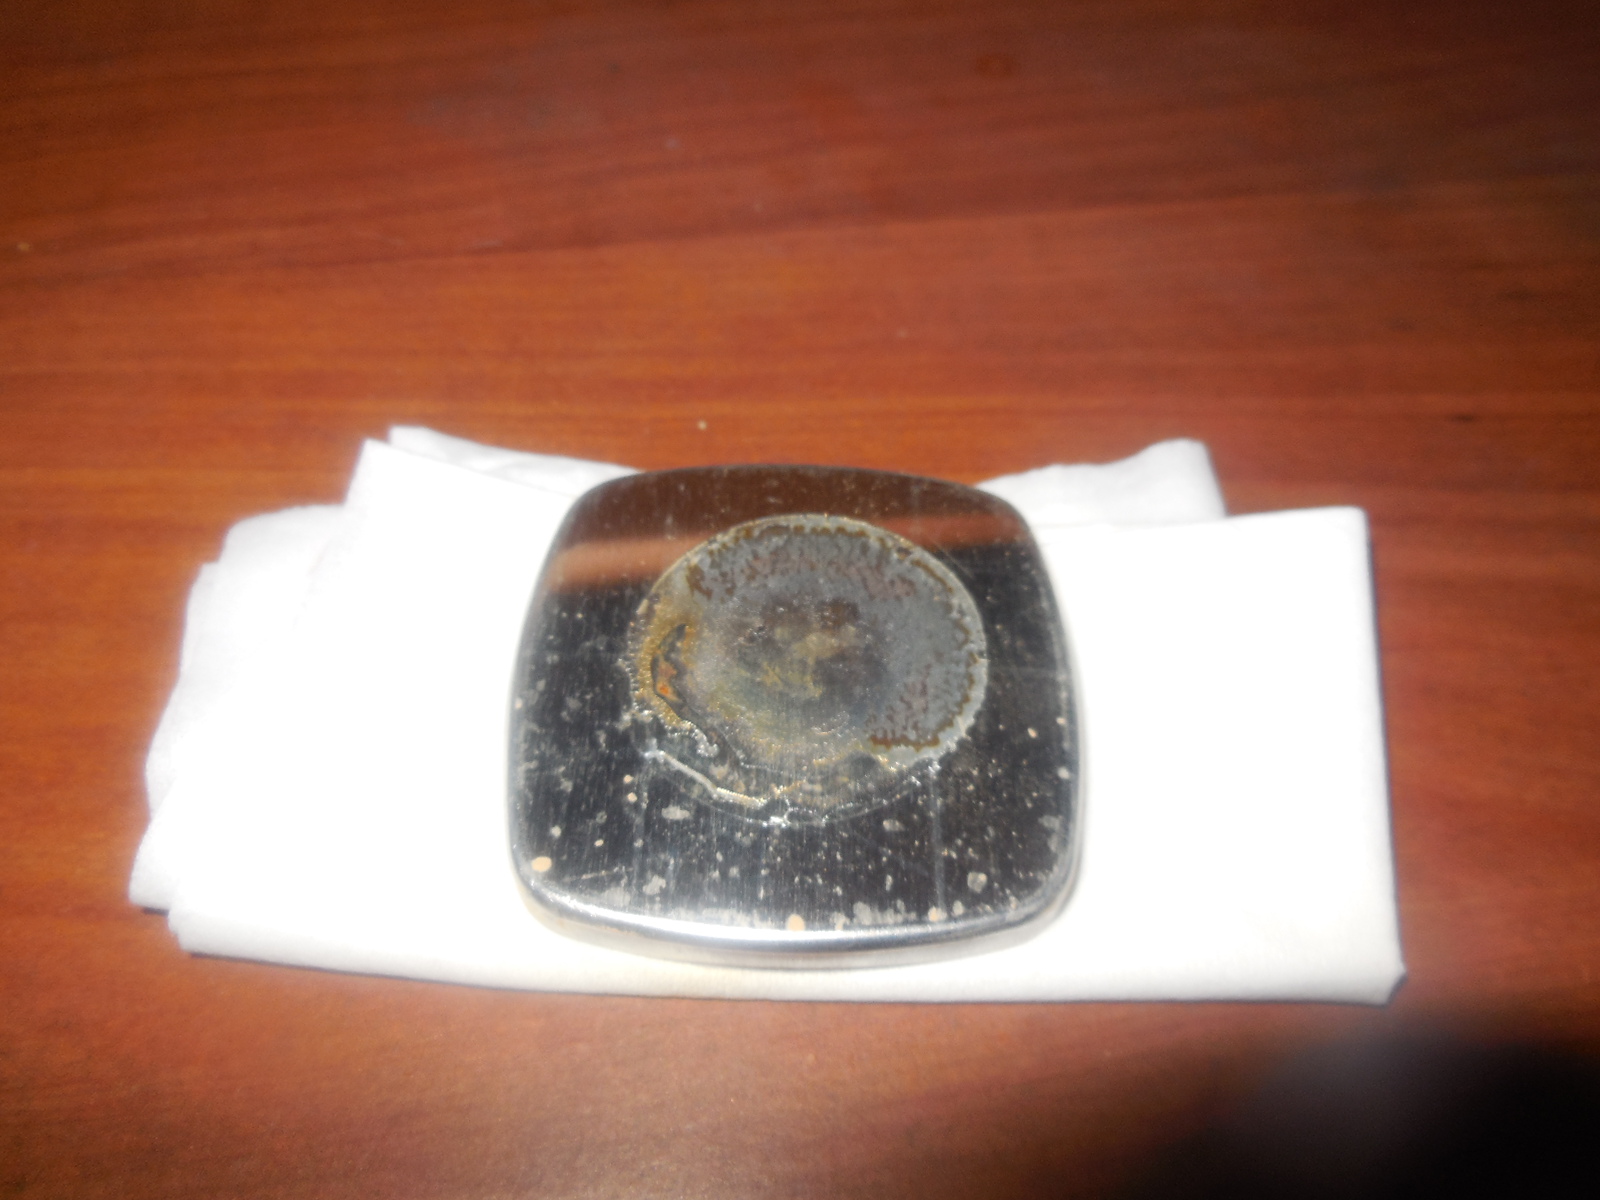
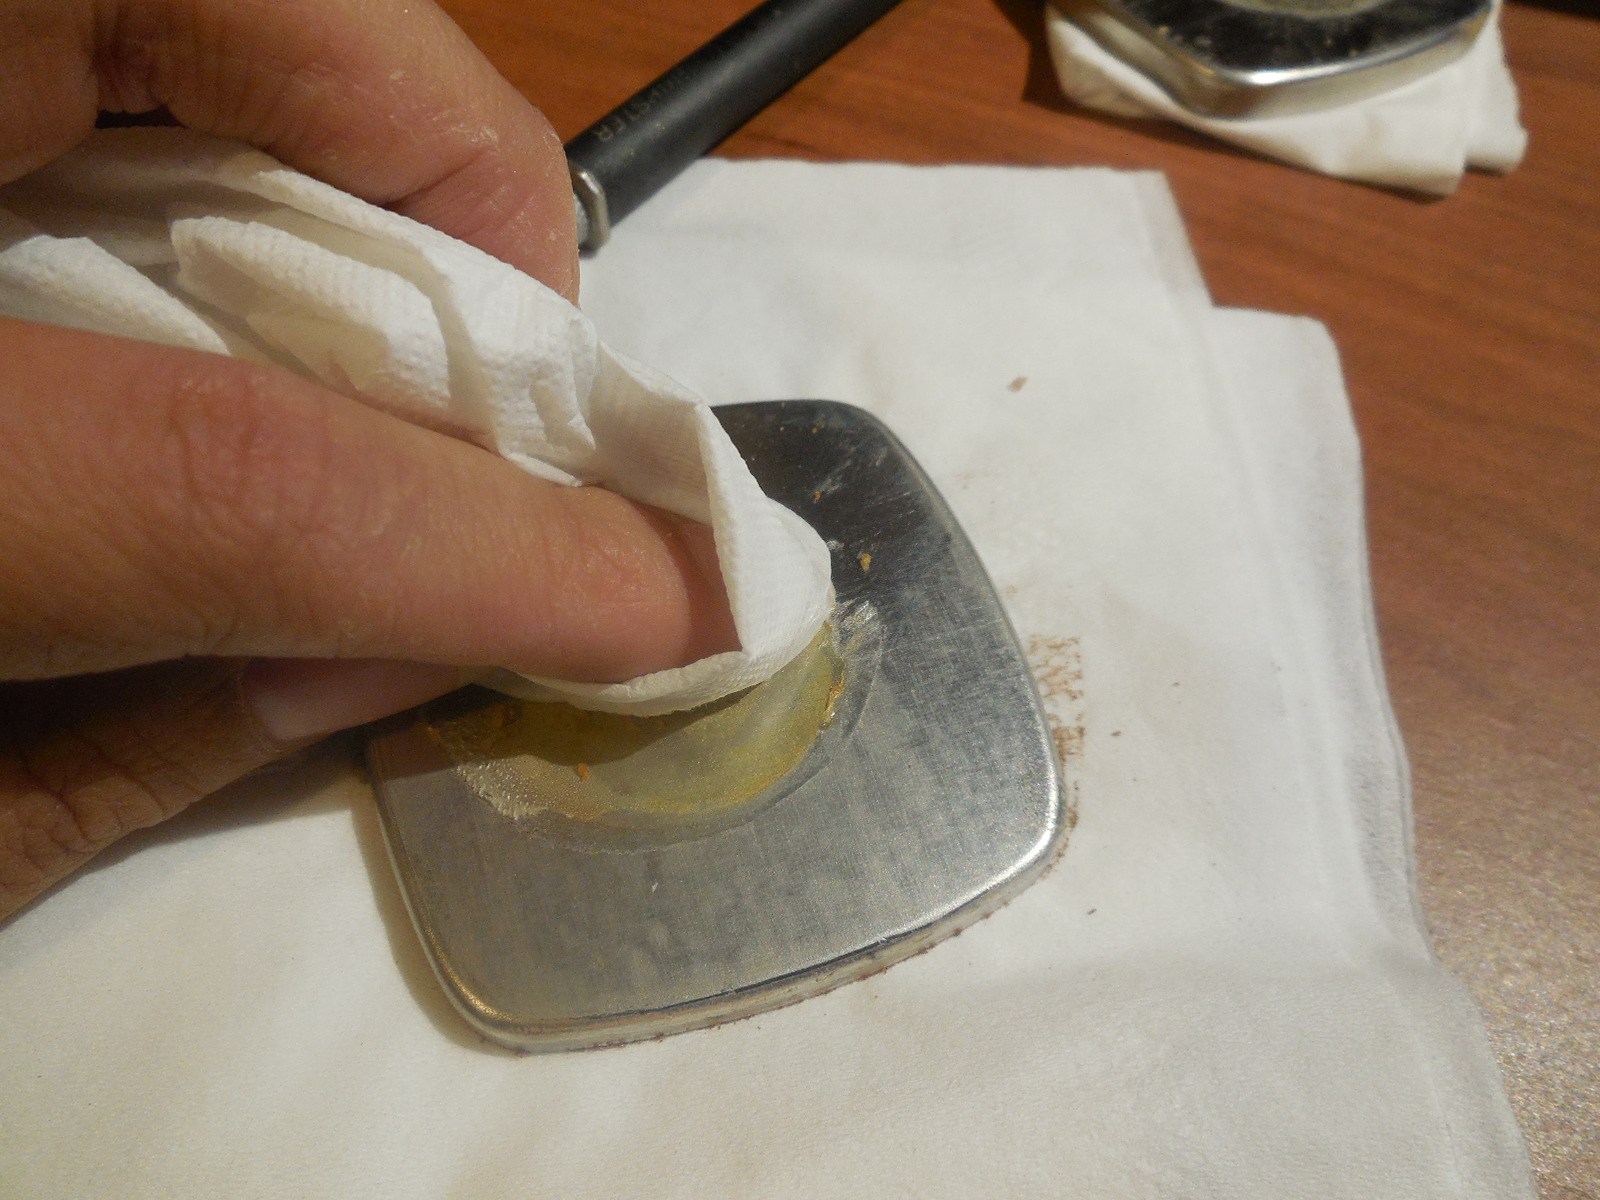
After struggling with the container to pop the pan out, I placed the product face down on a paper towel and used nail polish remover on another paper towel to rub the tacky glue from the bottom of the pan. You can use rubbing alcohol, but I found the acetone in nail polish remover to be much more effective in removing all the residue.

Clean Pan

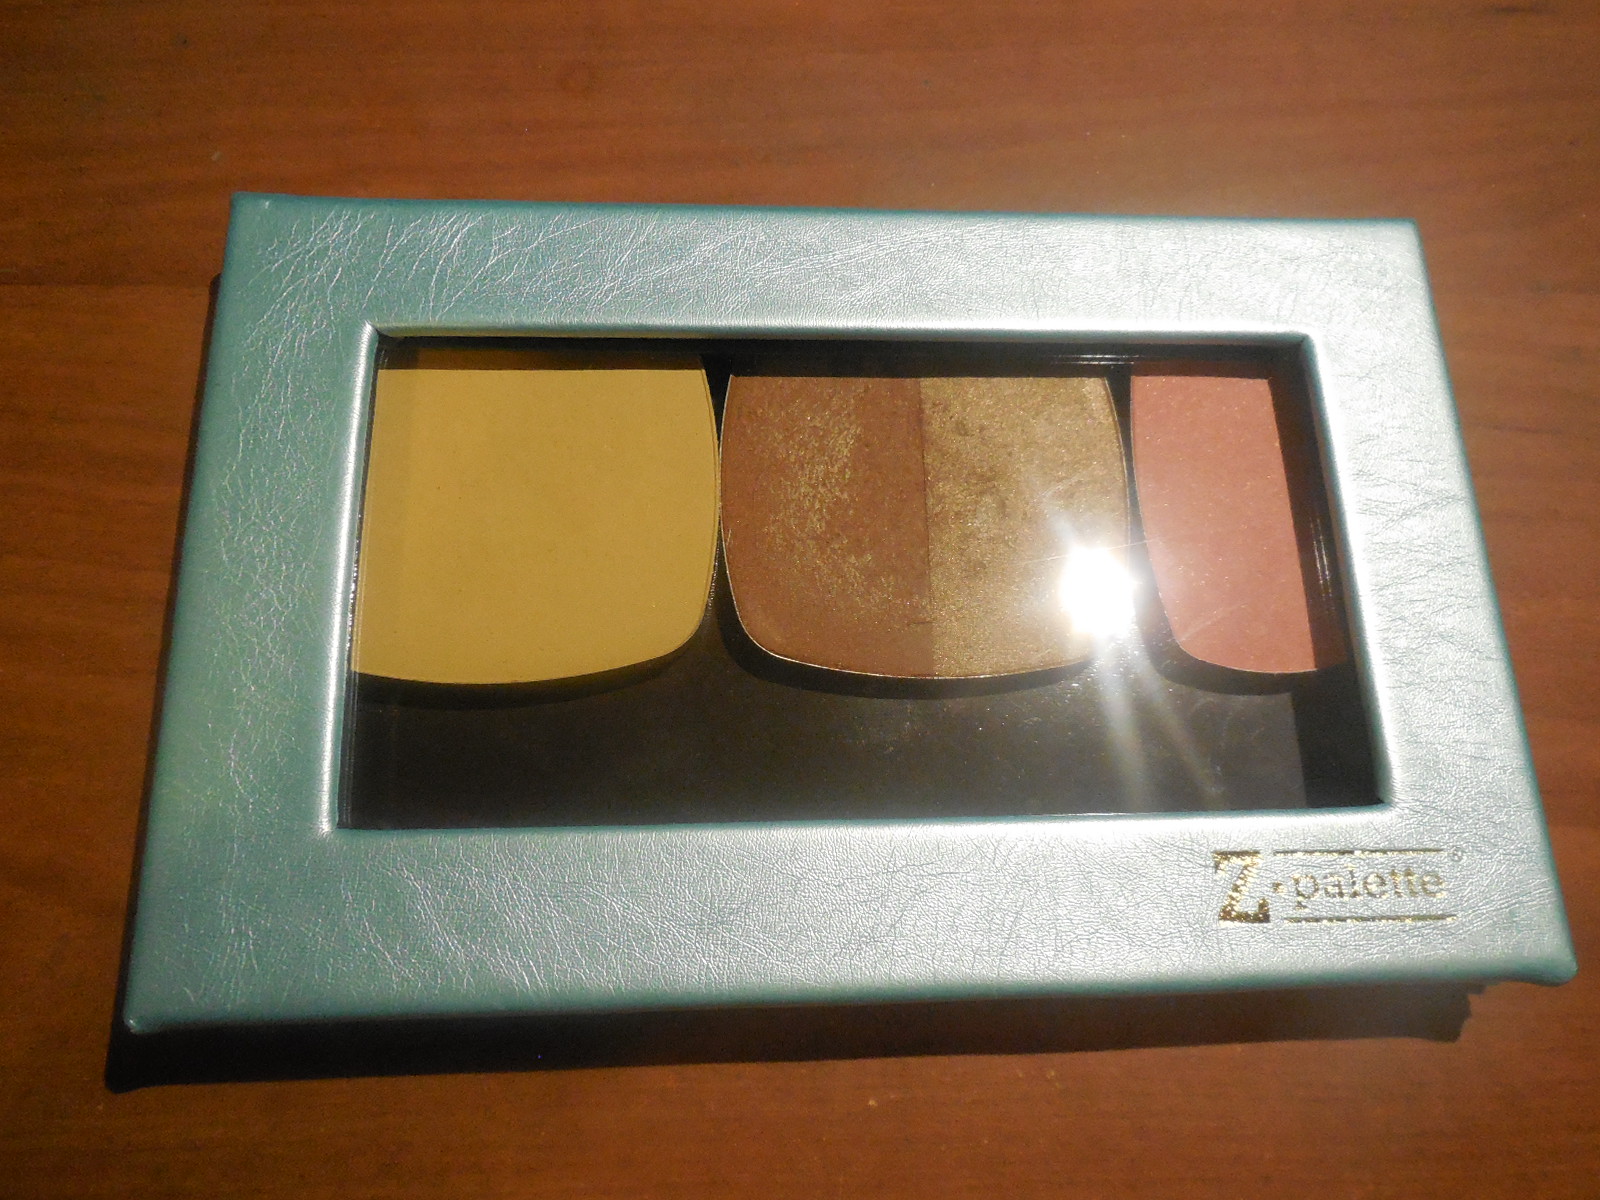
Once the back is clean, you can pop your depotted makeup into your magnetic palette of choice. I highly recommend z-palettes.

Z-Palette Open   Faux Blue Leather_4U

WARNING: Halogen lamps are VERY HOT and once you remove your compact from the lamp face. DON’T FORGET to also remove the tissue you place between the compact and the lamp face. You don’t want the tissue to burn and start a fire. I may have left a tissue for over five minutes once and it started to smoke.


0

I needed a bold red color lipstick for an event, but I didn’t know where to even begin. Being a fan of Buxom’s lip glosses, I decided to try their lipsticks.
Tokyo’s color is described as a “muted cranberry” on the Sephora site, but I see it more as a deep burnish red color.

The lipstick has a pointed tip allowing you to use the lip stick as a lip liner as well as a lipstick. The lipstick goes on very smoothly and is quite pigmented, and like all Buxom products, you still get the fun tingly sensation on your lips. The lipstick color is pretty long lasting, and is not drying like other lipsticks I’ve used in the past. However, I still recommend applying a little lip balm before applying the lipstick.

The lipstick is also advertised to plump your lips, but I don’t see that happening. If you want to “plump” your lips, I recommend going over the lipstick with a gloss.

To keep the tip sharpened, there is a built-in sharpener on the end of the pencil. I didn’t realize that the end of the pencil where the color swatch was actually removable until I read the box and found out it had a sharpener.

The built-in sharpener definitely makes using this lipstick while away from home ideal and very convenient if you just need to touch up your lips.

I’m probably going to try a different Buxom lipstick color because who doesn’t love that cool tingly feeling Buxom gives you?


0

At the end of October, BareMinerals gave away a free, full sized Big & Bright Eyeliner if you brought in a coupon to your local Bare Escentuals boutique. I haven’t had a great experience with BareMineral’s previous eyeliners, but for free I figured I would try it out.

My choices were Granite and Midnight – dark olive green and navy, respectively. I wasn’t sure which to pick and the girl at the counter suggested I go with the Granite. Sure, why not, I thought!

Once home, I opened up the box and discovered that Granite is a very dark olive/brown that makes a great every day eyeliner!

It’s a twist up-type eyeliner, which I love because i hate sharpening pencils. The other end of the eyeliner has a sharpener and a smudge tip (which I forgot to photograph). Usually with these sorts of eyeliners, I find I don’t use the sharpener unless the tip breaks since the way I use of the liner kind of makes it self-sharpening.

The eyeliner is very smooth and there is very little tugging while applying to my lower lash line. I did try this on the waterline and while there was no irritation, it didn’t last more than a few blinks before it was gone. This is not a waterproof eyeliner, nor was it designed for the waterline, so that result wasn’t exactly surprising.

After 4 or 5 hours, there was noticeable fading. I don’t think you will be able to wear this eyeliner all day without a touch up. On the plus side, I didn’t notice the eyeliner sliding down my face like I had with previous BareMineral eyeliners. I had some gathering in the outer corner of my eyes, but was easily wiped away with a fingertip. Removal is easy with regular makeup remover.

Overall, I really like this eyeliner and will definitely keep using it for casual day looks and less dramatic night looks.

BareMinerals Big & Bright eyeliner costs $14 and is available at Sephora and Bare Escentuals boutiques.


0

Still doing a tour of all my mascaras and the next one I’ve been trying out is the Buxom Lash Mascara. This one is apparently exclusive to Sephora stores, though, and isn’t sold in Bare Escentuals boutiques.

I’ve gotten a couple sample sizes of this mascara with my Beauty Insider points, so I have yet to pay for a full tube, but I think I might be doing so after those run out!

I like this brush a lot. The plastic brushes are my favorite and work better for me than the traditional spooly brushes. My eyelashes are kind of sparse, so the load of individual teeth on this brush work really well to coat each eyelash without clumping them together so I get a more natural look.

On that note, this mascara only adds a bit of length and volume, but nothing amazing. It makes a great every day mascara though.

Here are some before and after photos:

This mascara washes off easily with soap and warm water, which is great if you’re traveling and want to reduce the number of items you’re packing.

The one thing I can’t figure out is if this mascara is leaving dark smudges under my eyes. Sometimes it seems to and sometimes it doesn’t. It kind of varies and doesn’t seem to matter if I’m wearing primer or eyeliner or not. So, I’m still trying to work that one out. Otherwise, I do love this eyeliner and will probably keep using it.

Buxom Lash Mascara is available exclusively at Sephora and retails for $19.


0

For the longest time, I’ve been after an eyeliner that stays on the lower waterline without either disappearing or turning into a raccoon-eyed mess. I went out with a friend a few weeks ago and noticed that the eyeliner she used seemed to stay on perfectly without any smearing or smudging. She was using the BareMinerals Big & Bright Eyeliner.

I headed to the Sephora  in JC Penny’s to check out the eyeliner and a sales associate recommended the Buxom Insider Eyeliner to me instead. These $14.00 eyeliners are exclusive to Sephora and are specifically developed for wear on the lower lash line.

I purchased the eyeliner in Black Jade, a charcoal color that’s almost black. Opening the pencil once I got home, the tip was broken. Well, no big deal, I thought, and used the included sharpener to resharpen the tip. Yeah, that didn’t work. The really soft tip got stuck in the sharpener and broke off. I think next time I sharpen it, I’ll put it in the freezer first.

The liner is very, very soft and glides onto the waterline easily with no tugging. It’s difficult to get a thin line, but you can get an even coat in one stroke.

At first, I couldn’t decide if I liked the liner. It doesn’t really stay that well on the waterline and disappears in about an hour. However, I just took this liner with me on a trip out of town and after that long period of testing, I kind of love it!

Yes, it still disappears from my actual waterline, but if I line my eyes in the lower lash line as well and set the area with an eye shadow, it does stay on all day! Of course, the waterline faded away in a couple hours, but the rest of the line stayed pretty well. And even though some of the liner went away during the day, it didn’t smear down my eyes like eyeliners usually do. Removal is easy with standard eye makeup remover and a cotton swab or round.

This eyeliner performed much better than any I have tried before and I will certainly be purchasing another and maybe more in other colors!

Buxom Insider Eyeliner is available exclusively at Sephora. There are 10 shades available for $14.00 each.


0

I have never used a foundation primer until I went to Sephora and had a little bit applied onto my face as I got color matched for some bareMineral foundation. After that little taste of foundation primer and how soft and silky it made my skin feel, I was hooked. However, I was not hooked enough to want to spend $21 on a tiny bottle of primer. So before going on a splurge, I got a couple samples of bareMinerals Prime Time Foundation Primer and the Oil Control version to make sure they didn’t cause me to breakout.

Prime Time Foundation Primer (1 fl oz. – $21)

This primer goes on smoothly and evens out my skin. I love the silky feeling I get from the primer, and it also keeps my foundation powder on longer. The silky feeling from the primer isn’t very oil and is quickly absorbed into the skin though after using this for a couple days it caused me to have minor breakouts.

Pros: makes skin feel soft and silky, not too oily, a good foundation primer

Cons: Expensive, causes minor breakouts on my oily skin.

Prime Time Oil Control Foundation Primer (1 fl oz. – $21)

This primer is a lot thicker than the regular formula. The sample mini jar I had had a dollop of primer and it remained that way until I used it all. As for the regular primer, it is a lot oilier and the moment it was put in the jar it just started to coat the bottom of the jar, but the primer isn’t runny or watery just a bit viscous and not a thick gel like the Oil Control.

I found that because of the thickness of the Oil Control primer, I had to use more primer to cover my whole face, and it did not leave the nice silky feeling that the regular primer had. Also after about two hours, my face would feel very oily, oiler than usual, and I would have to blot out excess facial oil with blotting tissue. Maybe that is the function of oil control and it supposed to keep oil off the skin, but I really did not like the feeling of oil all over my T-zone. Also the primer sort of smelled like glue.

Despite these issues I had with the Oil Control Primer, the primer still did its job in keeping my foundation on; smoothing out my face and making my pores look smaller.

Pros: Works well as primer for mineral powders, did not cause breakouts

Cons: Expensive, primer is thick, does not have silky texture when applied, makes my skin feel very oily, smells like glue

After trying out these samples, I still could not bring myself to spend $21 on a tiny bottle of primer. But Cyn directed me to the Eyes Lips Face (E.L.F.) website and mentioned their primer ran for nearly half of the price of bareMinerals. So I figured it couldn’t hurt and gave it a try.

E.L.F. Mineral Infused Face Primer (.49 fl oz. – $6)

This primer was everything that I hoped for. Just a little pump and I have enough primer to cover my whole face. My face feels silky smooth and it does not cause me to break out. The primer is a great base for my powder foundation and does everything that the bareMinerals primer did. Though the main difference between primers is that it is not as viscous as the bareMinerals Prime Time formula, but the E.L.F primer is far from watery. Though the first time I used the primer, it did come out very watery, but it might have been because it was a really hot day because the next time I used it, the primer came out as a gel and has always been a gel-like texture ever since.

There have been complaints about the bottle pump being cheaply made and it stops pumping after several uses, but I have been using my bottle for a while and have not had any problems with the pump. The only minor problem I have is that the cap for the bottle is a bit loose and has a tendency to fall off when in my makeup bag.

Also you don’t need a lot of the primer to cover your whole face. I usually use only half a pump and it is more than enough to cover my entire face, so this little bottle should last you a while.

Overall I am very happy with the E.L.F. primer and will probably stick to it because it is much more cost effective for my tight budget.

Pros: Makes skin feel silky and soft, cheaper price, good foundation primer for mineral powders, has not caused me to breakout yet, don’t need a lot for whole face

Cons: A bit small, but two bottles of these still costs less than the other brand, cap for bottle not tight


5

The first time I used BareMinerals foundation was in 2001. I will admit to being sucking in by the non-stop infomercials all over TV, but after having used the original formula for over 5 years, I thought the coverage was great and I didn’t feel like I had a mask on face — all the things that were advertised.

There was one drawback to this foundation, though: it made my face itch. This happened over time and I kind of ignored it, thinking it was something else. Well, using my Mad Google Skillz, I discovered that a fair number of people were also having the same reaction and it was likely due to the bismuth oxycholoride. This mineral has not been shown to be toxic, but apparently, it can be an irritant. Their mineral eye shadows with bismuth were also making my eyes itch, so I had to search for alternatives.

After trying various samples from smaller mineral makeup companies, I settled on Everyday Minerals. I thought their prices were fair and when I started with them, they had great sample kits so I could figure out my color. Admittedly, their foundation didn’t have the same sort of coverage as BareMinerals, but their products don’t contain bismuth or talc so I could use them without a problem.

Recently, I received a mailing stating that BareMinerals had released a new SPF 15 Matte Foundation and samples would be available in Bare Escentuals boutiques and at Sephora. I had a look at the ingredients and it was certainly promising:

Active Ingredients: Titanium Dioxide, Zinc Oxide. Inactive Ingredients: Lauroyl Lysine, Silica, Calcium Silicate, Soil Minerals. May Contain: Mica, Titanium Dioxide, Iron Oxides

The only ingredient of theirs I am skeptical of are the “active soil minerals,” but whatever. I’m not worried about some lab dirt on my face. I was really excited that they were making a bismuth free foundation! Which also means this stuff does not sparkle. Now, I am not opposed to some sparkle, but honestly, it was a bit annoying being on set and having camera crew stop and stare at me and tell me that my makeup sparkled. I know guys; I’m secretly a Cullen, okay?

Needless to say, I ran to my local Bare Escentuals boutique, got color matched, and was luck enough to get one of the last remaining samples of Light. I’ve used this foundation every day for about two weeks prior to writing this review so I could make sure I didn’t have the same reaction and that it didn’t make my face break out. Well, I can happily say that thus far, this foundation has worked a treat. Good coverage and, when paired with Tarte’s Clean Slate face primer, it lasted me 10+ hours. It is about twice as much as I was paying for my other mineral foundation, but I feel this coverage is much better and one 6g container will last me nearly a year.

In the sample set, you get a 1g pot of foundation and tiny kabuki brush. Get rid of the brush. Seriously. BareMinerals brushes are crap. The bristles are harsh and abrasive and frankly, I think they were making my skin break out. I suggest getting brushes with full heads and soft Taklon bristles, like e.l.f. or EcoTools. For mineral foundation, I like e.l.f.’s Studio Line Powder Brush.

The amount in that jar should be plenty for you to try the foundation out for a week or two. If there aren’t any more packaged samples for you, ask the sales associate at Bare Escentuals or Sephora if they could give you a sample. They’ll usually give you a small sample pot with 0.5g or whatever they dump in it.

I did a sample application so you can have a look at the coverage. Photos are taken with a flash because that harsh light is going to show all sort of stuff you don’t see in soft light or even daylight… not that my face it totally awful. The first photo is me with a clean face, followed by just the BareMinerals foundation and an EDM concealer. The last picture is after I applied blush, eye shadow, and a finishing powder.

(Blush is e.l.f. in Coral; Eye shadow is Cotton Tale by Everyday Minerals & pink from a Beauty/UK palette; finishing powder by Fyrinnae.)

Overall, I am pretty happy with the new BareMinerals Matte Foundation and I hope it continues to perform well. I’m sure you’ll hear from me if it doesn’t.

Have any of you had experiences with mineral foundations you’d like to share?